Day-1: Azure-Terraform Basics
Azure Resource Group အကြောင်းကို မြန်မာလိုအနေနဲ့ ရှင်းပြပါမယ်။
🔷 Azure Resource Group ဆိုတာဘာလဲ?
Azure Resource Group ဆိုတာကတော့ Microsoft Azure ထဲမှာ သုံးတဲ့ resource တွေကို တစ်စုတစ်စည်းအဖြစ် စနစ်တကျစုစည်းထားတဲ့ အုပ်စု (logical container) တစ်ခုပဲဖြစ်ပါတယ်။
ဥပမာ - VM (Virtual Machine), Storage Account, Database, Load Balancer, Network အစရှိသဖြင့် Azure Resource တွေအများကြီးကို တစ်စုတည်းအဖြစ် သတ်မှတ်ပြီး ထိန်းချုပ်နိုင်ဖို့ Resource Group တစ်ခု ထားတဲ့ concept ပါ။
🔷 အသုံးပြုနည်း (Usage) နဲ့ အကျိုးဖြစ်ထွန်းချက်များ
၁။ 🔹 စနစ်တကျ စုစည်းခြင်း
Resource Group တစ်ခုထဲမှာ တူညီတဲ့ project, application, environment (dev/test/prod) နဲ့ သက်ဆိုင်တဲ့ resource တွေကိုစုထားနိုင်ပါတယ်။
ဥပမာ - “ecommerce-prod” ဆိုတဲ့ resource group မှာ production environment အတွက်လိုအပ်တဲ့ VM, DB, Network တို့ကိုထားနိုင်တယ်။
၂။ 🔹 Access Control (RBAC)
Resource Group အဆင့်မှာ Role-Based Access Control (RBAC) သုံးနိုင်ပါတယ်။
ဥပမာ - Developer Group ကို specific resource group အတွက် Read-Only Access ပေးနိုင်ပါတယ်။
၃။ 🔹 Tagging နဲ့ Cost Management
Resource Group ကို tag တွေတပ်နိုင်တာကြောင့် Cost Center, Project, Owner, Environment စတာတွေကို စနစ်တကျ စီမံနိုင်ပါတယ်။
Azure Cost Management ထဲမှာ resource group အလိုက် usage report တွေ ကြည့်နိုင်လို့ ချေးခွန်များ သိရှိရလွယ်တယ်။
၄။ 🔹 Deployment Scope
ARM Template / Bicep Template တွေနဲ့ IaC (Infrastructure as Code) ဖြင့် deployment လုပ်တဲ့အခါ Resource Group အပေါ်မှာ Run လုပ်ပါတယ်။
တစ်ခါတည်းမှာ App အားလုံးကို Deploy လုပ်နိုင်ပါတယ်။
၅။ 🔹 Monitoring နဲ့ Policy
Azure Monitor, Azure Policy တို့ကို resource group အပေါ်မှာသာလျှင် configure လုပ်နိုင်ပါတယ်။
လုံခြုံရေးနဲ့ သတ်မှတ်ထားတဲ့ Compliance ကို သေချာစေပါတယ်။
🔷 ဥပမာ (Use Case)
သင် WordPress site တစ်ခု production မှာ ထားချင်တယ် ဆိုပါစို့။
wordpress-prodဆိုတဲ့ Resource Group တစ်ခုဖန်တီးမယ်။အဲဒီ group ထဲမှာတော့ –
Web Server အတွက် EC2 instance (VM)
Database (MySQL)
Load Balancer
Network & Security Groups
Storage (EFS or Blob Storage)
ဆိုပြီး တစ်ခုတည်းအဖြစ် group လုပ်ထားပြီး အကုန်လုံးကို စုစည်းထားနိုင်တယ်။ ပြီးရင် ထိန်းချုပ်ရာမှာလည်း လွယ်ကူတယ်။
Azure CLI ကိုသုံးပြီး Resource Group တစ်ခုကို ဖန်တီးတဲ့ Lab လေးကို အဆင့်လိုက်ပြပေးပါမယ်။ 😊
🔧 Lab: Azure CLI ဖြင့် Resource Group ဖန်တီးခြင်း
✅ Prerequisites
Azure CLI install လုပ်ပြီးသားဖြစ်ရမယ်
👉 Azure CLI Install GuideAzure Account တစ်ခုရှိရမယ်
CLI မှာ login ဝင်ထားဖို့လိုတယ်
az login
🛠️ Step 1: Resource Group ဖန်တီးမယ်
az group create \
  --name my-demo-rg1 \
  --location southeastasia
📌 ဒီမှာ
--name= Resource Group Name (မိမိ Project နာမည်နဲ့တူအောင်ပေးလို့ရပါတယ်)--location= Region (မြန်မာနဲ့နီးတဲ့southeastasiaကိုလဲ သုံးနိုင်ပါတယ်)
🧪 Step 2: Resource Group List ကြည့်မယ်
az group list --output table
ဒီအတိုင်း Resource Group များကို စာရင်းအဖြစ် ပြသပေးမှာဖြစ်ပြီး Location, Provisioning State, Name စတာတွေကို မြင်ရပါလိမ့်မယ်။
🧼 Step 3: Resource Group ဖျက်ချင်တဲ့အခါ
az group delete --name my-rg-lab --yes --no-wait
--yesဆိုတာက confirmation မလိုဘဲ အတည်ပြုပေးလိုက်တာပါ။--no-waitဆိုတာက background မှာဖျက်နေစေဖို့ပါ။
🌍 Terraform Workflow 🌍
Infrastructure as Code involves a series of well-thought-out steps to ensure everything works smoothly.
Terraform မှာ Infrastructure (VM, VPC, DB, Storage စတဲ့ Cloud resources) တွေကို Code နဲ့ရေးပြီး Provision လုပ်နိုင်ပါတယ်။ ဒါကို IaC (Infrastructure as Code) လို့ ခေါ်ပါတယ်။
✅ Terraform Workflow 5 Steps
1️⃣ terraform init
အသုံးပြုမှု 👉 ပထမဆုံး ဆောင်ရွက်ရမယ့်အဆင့်
တာဝန် ⇒
Terraform working directory ကို initialize လုပ်တယ်
provider(AWS, Azure, GCP, etc.) တွေကို download လုပ်တယ်
eg:
terraform init
အခုလို terraform init လုပ်လိုက်တဲ့အခါမှာ .terraform/ folder နဲ့ .terraform.lock.hcl file တွေကို auto generate ပြုလုပ်လိုက်ပြီး အဲဒါက Terraform project folder ထဲမှာ အရေးကြီးတဲ့ role တွေကို ထမ်းဆောင်ပါတယ်။
📁 .terraform/ Folder
ဒီ folder က local Terraform working directory ထဲမှာ auto ဖြစ်လာတာပါ။
✅ ဘာတွေ ပါလဲ?
Plugin Caching (Provider)
Azure ဆိုတဲ့ provider (azurerm) ကို HashiCorp Registry မှာမှ download လုပ်ပြီး
.terraform/providers/ထဲမှာ သိမ်းထားတယ်။ဒါကြောင့် internet connection မရှိချိန်မှာပါ Terraform ကို re-run လုပ်နိုင်တယ်။
Modules (ရှိခဲ့လျှင်)
- သင်
moduleကို remote (GitHub, Terraform Registry) မှာမှသုံးခဲ့ရင်.terraform/modules/ထဲမှာ fetch လုပ်တယ်။
- သင်
Dependency Locking Metadata
- Terraform ရဲ့ internal state/cache တချို့ကိုထားတယ် (ဒီအကြောင်းအနည်းငယ် lockfile မှာလည်းပါလာတယ်)။
📄 .terraform.lock.hcl
ဒါက Terraform Provider Dependency Lock File ဖြစ်ပါတယ်။ (Terraform v0.14+ မှာအထူးသဖြင့်)
✅ ဘာအတွက်သုံးတာလဲ?
✅ Provider Version Locking
azurerm,aws,googleစတဲ့ providers တွေရဲ့ exact version, source, checksums တွေကို သိမ်းထားတယ်။မတူတဲ့ team members တွေမှာ exact same provider version တွေသုံးဖို့ကူညီတယ်။ (အတူတူ result ထွက်ဖို့)
✅ Checksum Security
- Provider binary download လုပ်တဲ့အချိန်မှာ hash ကိုစစ်တာကြောင့် MITM attacks ကနေကာကွယ်တယ်။
✅ Immutable Record
- Git repo ထဲမှာ commit ထားမယ်ဆိုရင်, team-wide reproducibility ရတယ် (CI/CD pipelines, multi-developer envs...)
🛠️ Example .terraform.lock.hcl
provider "registry.terraform.io/hashicorp/azurerm" {
  version = "3.80.0"
  constraints = ">= 2.0"
  hashes = [
    "h1:abc123...",
    "h1:def456...",
  ]
}
📌 Summary Table
| File/Folder | Description |
.terraform/ | Provider, module cache, and local metadata |
.terraform.lock.hcl | Provider version locking & checksum validation |
📎 သတိပြုဖို့
.terraform/folder ကို Git repo ထဲမှာထည့်စရာမလိုဘူး (usually.gitignoreထဲထည့်တယ်).terraform.lock.hclfile ကို Git ထဲမှာ commit ထားဖို့သင့်တော်တယ် (CI/CD & team members တွေ consistency ရဖို့)
2️⃣ terraform validate
အသုံးပြုမှု 👉 configuration file မှာ syntax error ရှိ/မရှိ စစ်တယ်
တာဝန် ⇒
- Terraform file (
.tf) တွေကို grammar & logic အလားတူစစ်တယ်
- Terraform file (
eg:
  terraform validate
  Success! The configuration is valid.
3️⃣ terraform plan
အသုံးပြုမှု 👉 လုပ်ဆောင်မယ့်အပြောင်းအလဲတွေကိုကြည့်ချင်တဲ့အခါ
တာဝန် ⇒
Terraform က current state နဲ့ desired state ကိုယှဉ်ပြီး ပြောင်းလဲမယ့် အရာတွေကိုပြတယ်
ထိုသို့ပြမယ်ဆိုပေမဲ့ တကယ် apply မလုပ်သေးပါ
eg:
terraform plan
4️⃣ terraform apply
အသုံးပြုမှု 👉 plan ထဲမှာမြင်တဲ့အတိုင်း infrastructure တကယ်တည်ဆောက်ဖို့
တာဝန် ⇒
Cloud Infrastructure ကို တကယ် provision လုပ်တယ်
“Are you sure?” ဆိုပြီး confirmation တောင်းတယ်
eg:
terraform apply
terraform apply လုပ်လိုက်တဲ့အခါ .terraform.tfstate.lock.info နဲ့ terraform.tfstate ဆိုတဲ့ file နှစ်ခုထွက်လာပါတယ်။ ဒါတွေဟာ Terraform ရဲ့ state management နဲ့ locking mechanism နဲ့ပါတ်သတ်ပါတယ်။
📄 terraform.tfstate ဆိုတာဘာလဲ?
✅ အဓိပ္ပါယ်
- ဒီ file က Terraform ရဲ့ “real world infrastructure” နဲ့ “configuration files” ကြားမှာ sync ဖြစ်အောင်လုပ်ပေးတဲ့ state file ဖြစ်ပါတယ်။
✅ ဘာတွေထဲမှာပါလဲ?
Azure (သို့မဟုတ် AWS/GCP) ပေါ်မှာ ဖန်တီးထားတဲ့ resources တွေရဲ့ metadata.
resource ID, name, region, properties, etc.
Terraform သိထားတဲ့ current state.
// tfstate example (shortened)
{
  "resources": [
    {
      "type": "azurerm_resource_group",
      "name": "my_demo_rg1",
      "instances": [
        {
          "attributes": {
            "name": "my-demo-rg1",
            "location": "eastus"
          }
        }
      ]
    }
  ]
}
📌 သတိထားရန်
ဒီဖိုင်ကို delete လုပ်လိုက်ရင် Terraform က “လက်ရှိ ဘာတွေဖန်တီးထားတယ်” ဆိုတာမသိတော့ပါဘူး။
production environment မှာဆိုရင် ဒီ file ကို version control (ဥပမာ: Terraform Cloud, S3 backend with locking) နဲ့ ထိန်းသိမ်းဖို့အရေးကြီးတယ်။
📄 .terraform.tfstate.lock.info ဆိုတာဘာလဲ?
✅ အဓိပ္ပါယ်
ဒီဖိုင်က Terraform apply လုပ်နေစဉ်မှာ state file ကိုတစ်ယောက်တည်းသာ access လုပ်နိုင်အောင် lock ချထားတဲ့ file ဖြစ်တယ်။
Lock file က race condition (အချိန်တပြိုင်နက်တည်းမှာသူတစ်ပါးကတည်းပြင်တာ) ကိုကာကွယ်ဖို့အတွက်ပါ။
✅ ဘယ်အချိန်မှာ ဖြစ်လာသလဲ?
terraform apply,terraform planduring execution only.Task ပြီးတာနဲ့ ဖျက်သွားတယ် (auto-delete)
✅ ဘာတွေထဲမှာ ပါလဲ?
{
  "ID": "a1b2c3d4",
  "Operation": "OperationTypeApply",
  "Who": "your-username@machine",
  "Version": "1.7.2",
  "Created": "2025-04-10T15:30:00Z"
}
📌 Summary Table
| File Name | Description |
terraform.tfstate | Infra. state — Terraform နဲ့ Cloud Infra တွေ sync ဖြစ်ဖို့။ |
.terraform.tfstate.lock.info | State ကို simultaneous access မဖြစ်အောင် lock ချဖို့။ |
💡 Usage Tips
Local backend မှာဆိုရင်
.terraform.tfstateရဲ႕ backup (eg:terraform.tfstate.backup) လည်း ထွက်နိုင်တယ်။S3 backend, Terraform Cloud နဲ့သုံးတဲ့အခါ automatic locking support ပေးတယ်။
.lock.infofile မမြင်နိုင်တော့တယ်။
5️⃣ terraform destroy
အသုံးပြုမှု 👉 ဖန်တီးထားတဲ့ Infrastructure တွေကို ဖျက်ချင်တဲ့အခါ
တာဝန် ⇒
Provision လုပ်ထားတဲ့ resources တွေကိုဖျက်တယ်
ထပ်မံအတည်ပြုမှုတောင်းတယ်
eg:
terraform destroy
🛠️ Terraform ဖြင့် Azure တွင် Resource Group တစ်ခု ဖန်တီးခြင်း
Azure CLI နဲ့ Terraform ကိုပေါင်းပြီး Infrastructure as Code (IaC) နည်းနဲ့ Azure ထဲမှာ resource group တစ်ခု ဖန်တီးချင်တဲ့အခါ
✅ Pre-Condition 1 — Azure Region ရွေးခြင်း
az account list-locations -o table
🔍 ဘာလုပ်တာလဲ? Azure ထဲမှာရှိတဲ့ Region တွေ (eastus, westus, southeastasia...) ကိုကြည့်ပြီး ကိုယ့် resource group ကိုဘယ် Region မှာဖန်တီးမလဲဆုံးဖြတ်မယ်။
✅ Pre-Condition 2 — Azure CLI Login
az login
az account list
az account set --subscription="SUBSCRIPTION_ID"
🔐 ဘာလို့လုပ်ရတာလဲ? Terraform က Azure CLI ကိုအသုံးပြုက authentication mechanism ကိုသုံးတာမို့ login လုပ်ထားဖို့လိုပါတယ်။ သုံးမယ့် subscription ကိုရွေးရပါတယ်။
📄 Terraform Configuration
# Terraform Settings Block
terraform {
  required_version = ">= 1.0.0"
  required_providers {
    azurerm = {
      source = "hashicorp/azurerm"
      version = "~> 3.112" # Example:  Major and minor version match, but allows patch updates
    }
  }
}
Terraform version & provider requirement တွေဖြစ်တယ်
azurermဆိုတာက Azure provider ဖြစ်တယ်။
# Configure the Microsoft Azure Provider
provider "azurerm" {
  features {}
}
- Azure CLI authentication ကို default နဲ့သုံးဖို့အတွက် empty
features {}ကိုသုံးတယ်။
🧱 Resource Group Create
# Create Resource Group
resource "azurerm_resource_group" "my_demo_rg1" {
  location = "eastus"
  name = "my-demo-rg1"
}
eastusregion မှာ"my-demo-rg1"ဆိုတဲ့ resource group တစ်ခုဖန်တီးမှာဖြစ်တယ်။
🔁 Terraform Commands Step-by-Step
1️⃣ terraform init
- Provider တွေ download လုပ်တယ်။
2️⃣ terraform validate
- Syntax မှားတာရှိ/မရှိ စစ်တယ်။
3️⃣ terraform plan
- ဘာတွေဖန်တီးမလဲ ပြသတယ်။
4️⃣ terraform apply
- ကိုယ့် configuration အတိုင်း resource group တကယ်ဖန်တီးတယ်။
🔍 Verify in Azure Console
[Azure Portal → Resource Groups] မှာသွားကြည့်ပြီး
"my-demo-rg1"ဖြစ်ပြီးမဖြစ်စစ်တယ်။
📂 Review terraform.tfstate
Terraform က
terraform.tfstateဖိုင်မှာ resource info ကို state အနေနဲ့သိမ်းထားတယ်။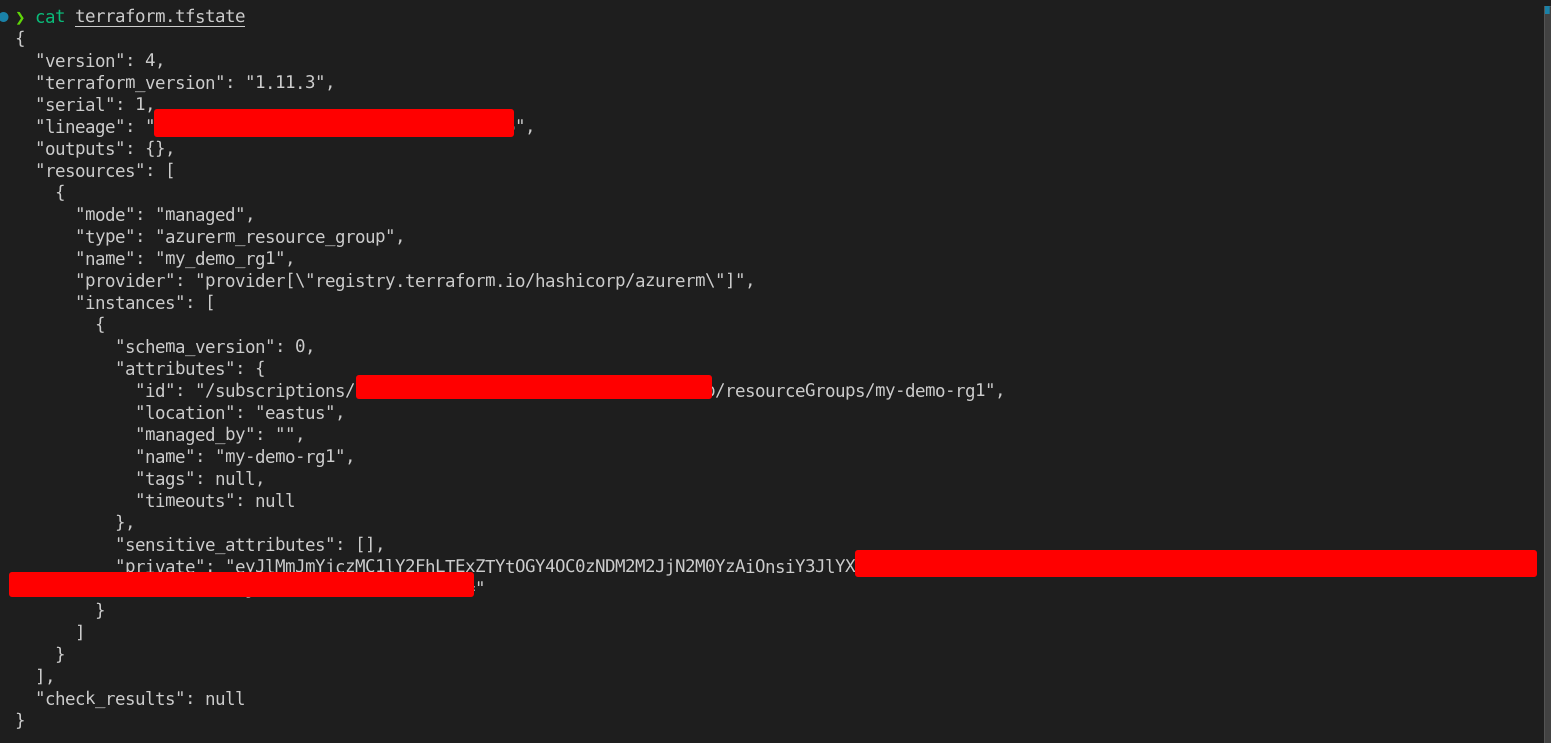
❌ Destroy Infrastructure
terraform destroy
ဖန်တီးထားတဲ့ resource group ကိုဖျက်တယ်။
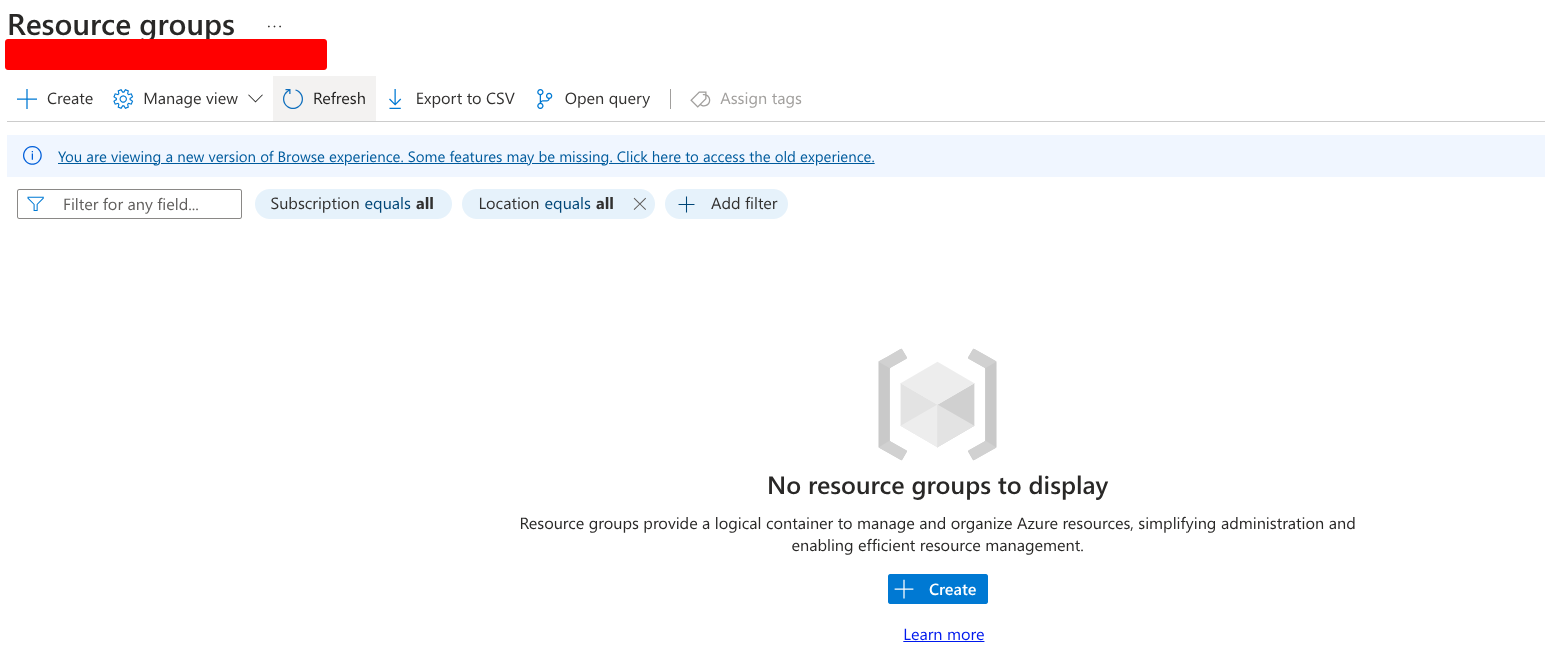
terraform.tfstatefile ထဲက resource data ကို ပြန်ဖယ်ရှားသွားတယ်။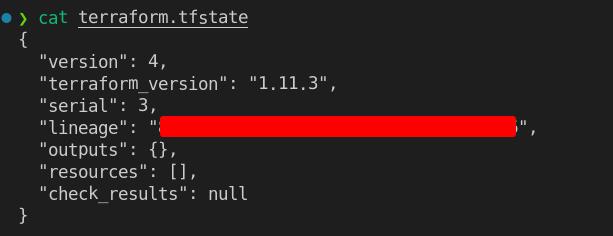
terraform.tfstate.backupထဲမှာ backup info သိမ်းထားတယ်။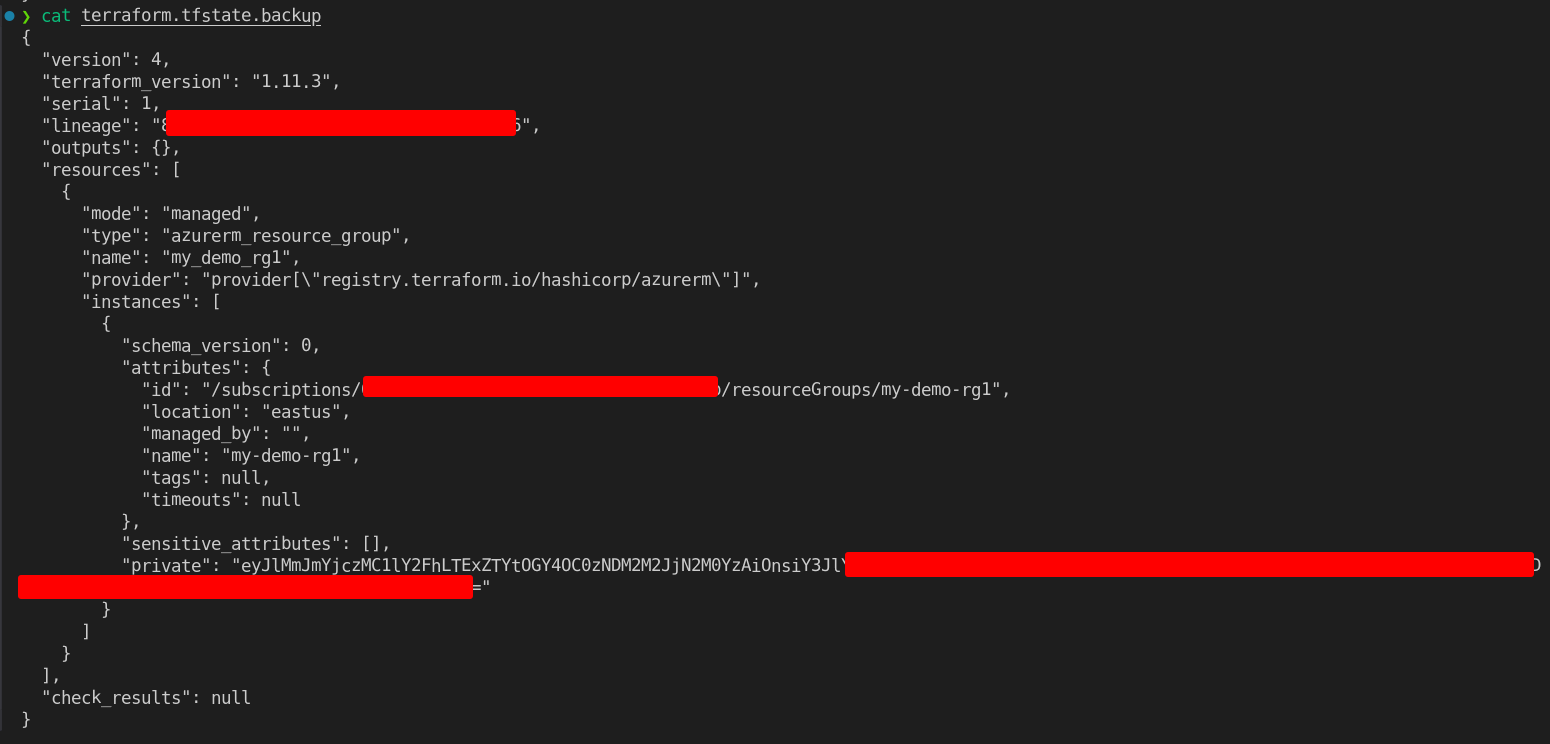
terraform.tfstate.backup file ကနေ Terraform resource state ကိုပြန် restore လုပ်လို့ရပါတယ်။ ဒါပေမယ့် resource တွေကို auto-restore လုပ်တာမျိုးမဟုတ်ပါဘူး။ Manual steps လုပ်ဖို့လိုပါတယ်။
အောက်မှာ အသေးစိတ်ရှင်းပြပေးမယ်။
📄 terraform.tfstate.backup ဆိုတာဘာလဲ?
ဒါက
terraform applyသို့မဟုတ်terraform destroyလုပ်တဲ့အချိန်မှာ.tfstatefile ထဲက ပြောင်းလဲမှုဖြစ်တဲ့အခါ မပြောင်းမီ original state ကို backup လုပ်ထားတဲ့ file ပါ။Fail ဖြစ်ခဲ့တယ် (ဥပမာ: Network ပြဿနာ၊ Terraform crash) ဆိုရင် ဒီ
terraform.tfstate.backupကအရေးကြီးပါတယ်။
🛠️ Resource Creation ကို Restore လုပ်နည်း
❗ Terraform project folder ထဲမှာရှိတဲ့
terraform.tfstatefile ကို ရှင်းရှင်းလင်းလင်းဖတ်ပါ။❗ Backup ထဲက state ကို ပြန်သုံးချင်တယ်ဆိုရင်...
# Step 1: Delete corrupted or wrong tfstate file
rm terraform.tfstate

# Step 2: Copy the backup file to be the new state
cp terraform.tfstate.backup terraform.tfstate
- ✅ ပြီးရင် Terraform commands တွေပြန် run လုပ်နိုင်ပါပြီ:
terraform plan
terraform apply
👉 ဒါကဆို backup ထဲက state ကိုအခြေခံပြီး terraform က ဘာတွေမလား ဆိုတာ သိနိုင်ပါတယ်။
❗ သတိထားရန်
terraform.tfstate.backupမှာရှိတဲ့ resource IDs တွေက Azure (သို့မဟုတ် AWS) ပေါ်မှာ နေရင်သာ သုံးလို့ရတယ်။resource ကိုပြန်ဖန်တီးဖို့မဟုတ်ပါဘူး။ ဒါဟာ Terraform အတွက် tracking (state tracking) restore လုပ်တာသာ ဖြစ်တယ်။
🧠 Example Scenario
သင်က accidentally
terraform destroyလုပ်ပြီး.tfstateမှာ data မရှိတော့ပါ။ဒါပေမဲ့ resources တွေက Cloud ပေါ်မှာ မဖျက်ရသေးဘူး။
ဒီအချိန်မှာ
terraform.tfstate.backupကို restore လုပ်ပြီး plan/apply ပြန်လုပ်တယ်ဆိုရင်, Terraform က Cloud Infra နဲ့ state ကို sync ပြန်လုပ်ဖို့ကြိုးစားပါလိမ့်မယ်။
✅ terraform destroy --auto-approve ဆိုတာဘာလဲ?
terraform destroyဆိုတာက Terraform သုံးပြီး ဖန်တီးထားတဲ့ resources တွေကို delete/finalize/remove လုပ်ပေးတဲ့ command ပါ။--auto-approveဆိုတာကတော့ ဒီ command run လုပ်တဲ့အချိန်မှာ "Are you sure you want to destroy?" ဆိုတဲ့ confirmation မေးခွန်းကို မမေးဘဲ တစ်ခါတည်းဖျက်လိုက်မယ် ဆိုတဲ့အဓိပ္ပါယ်ပဲဖြစ်ပါတယ်။
🧹 Cleanup
rm -rf .terraform*
rm -rf terraform.tfstate*
- Terraform-related local files တွေကိုဖျက်လိုက်တယ်။
🧠 နိဂုံးချုပ် (Conclusion)
✨ ကျွန်တော်တို့ဘာတွေ လေ့လာခဲ့သလဲ?
Azure CLI ဖြင့် login & region/ subscription တွေကို handle လုပ်နည်း
Terraform Manifest ဖတ်နည်း
Terraform commands တွေရဲ့လုပ်ဆောင်ချက်များ
init→ Initializevalidate→ Syntax checkplan→ Preview actionsapply→ Create resourcedestroy→ Remove resource